Review
Reviewing reconciliation order to ensure the payout details.
"Review" refers to the review process to approve or reject a reconciliation order. People who have approval permission can approve a single or multiple requests on OwlPay “Review” page.
After review, only approved reconciliation requests will display on the Payout page. Rejected requests return to the Reconciliation page.
- You have approval/rejection permission.
- Orders have been selected for reconciliation.
How to view reconciliation orders available for review
On the “Review” page, only requests available for review are displayed. You must first initiate a reconciliation order on the Reconciliation page.
On this page, you will see:
- Status: review the status of the reconciliation request, please refer to the Order review status for details.
- Total amount: total transaction amount of the reconciliation request
- Reconciliation order number: serial number of the reconciliation request
- Vendor / Custom ID: "vendor name" and "custom vendor id" on the OwlPay system
- Note: notes on this reconciliation order
- Review progress: review the progress of reconciliation order, see “Review progress description” for more details
- Receipt: receipt files uploaded by the vendor

You can adjust the display table columns by clicking the "Customize" and "Filter" buttons; click "Export" to download all the order information to your computer as .csv.
How to view the reconciliation orders under review?
When you're on the reconciliation order review page, you will see three main sections.
- Review Progress
- Total Order Sales
- Review Order
Names and amounts contained in the diagrams are only for demonstration purposes and do not refer to real transactions.
Review progress section
This section shows the review status of the reconciliation order. You can see how many orders needed to be reviewed, the review history... etc.
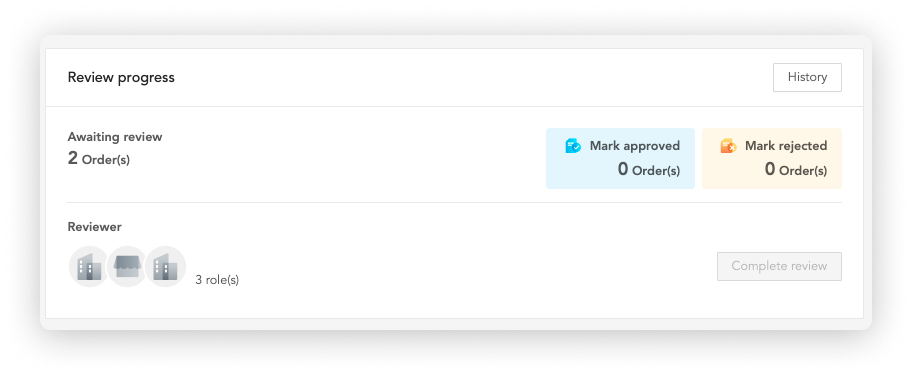
Column details are:
- History: shows the review history of this reconciliation request, including the initiator, DateTime, order, and comments.
- Awaiting review: shows the number of orders needed to be reviewed for this reconciliation request.
- Mark approved / Mark rejected: shows the number of orders that have been approved/rejected.
- Reviewer: shows which role has review permission. You can change this setting by reaching your OwlPay contact.
- Complete review: when orders are all marked approved, people having review permission can complete the reconciliation order.
Total order sales section
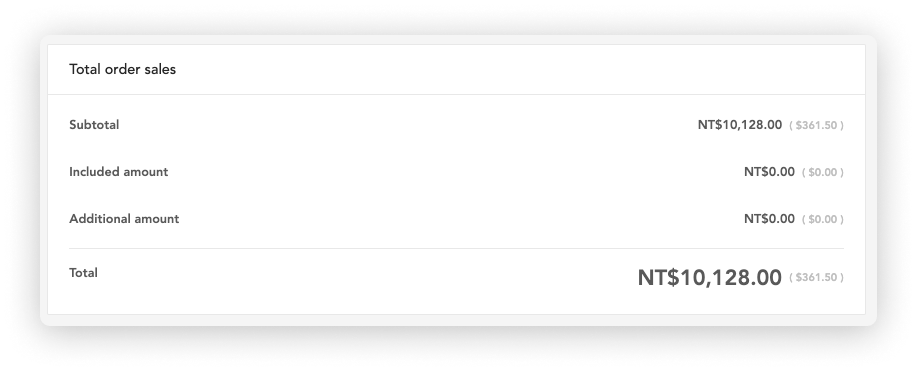
This section shows the status of orders in this reconciliation order, including
- Subtotal: total sales for all orders
- Taxed: total taxable amount of all orders
- Extra charge: total extra charges for all orders
- Total: sum of subtotal, taxed and extra charge
Review order section
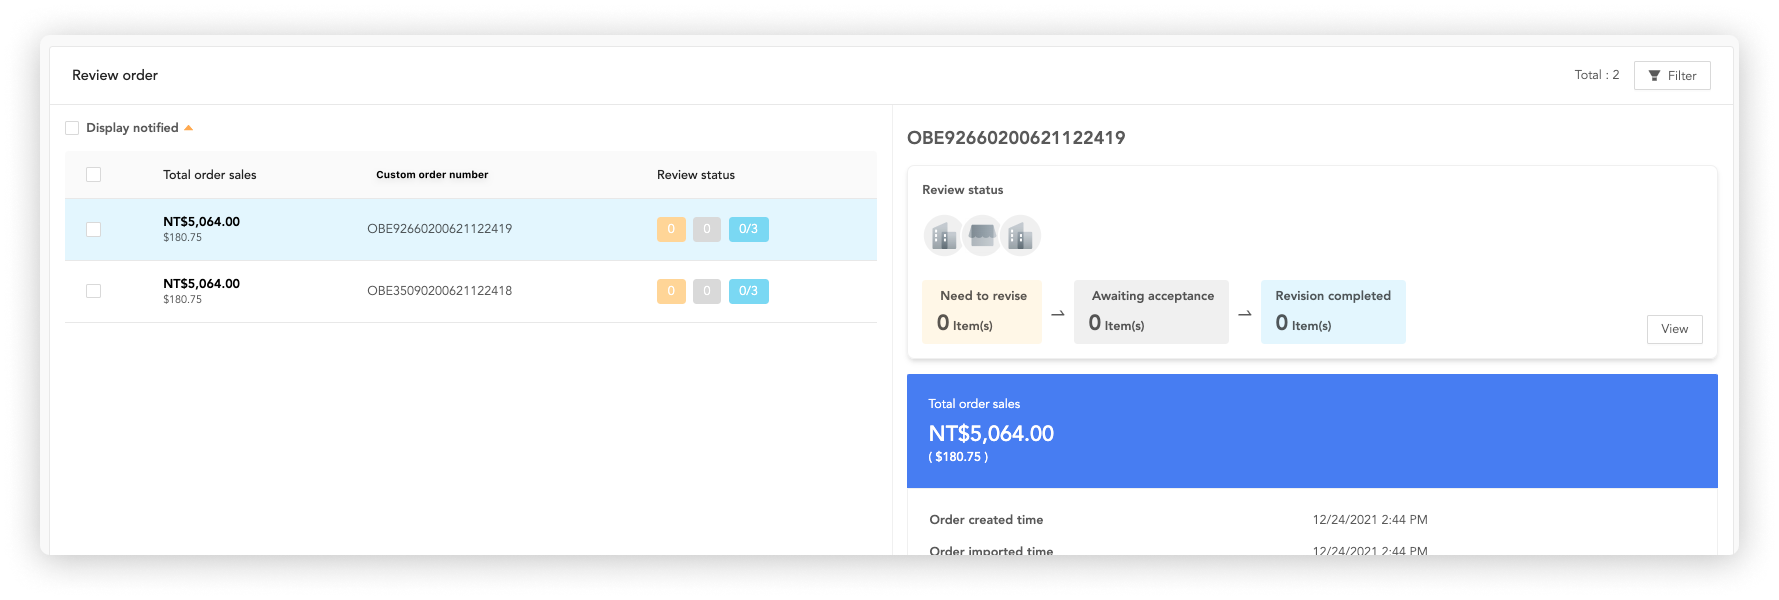
This section can be divided into three subsections: Order list, Review status and Order details.
A. Order list
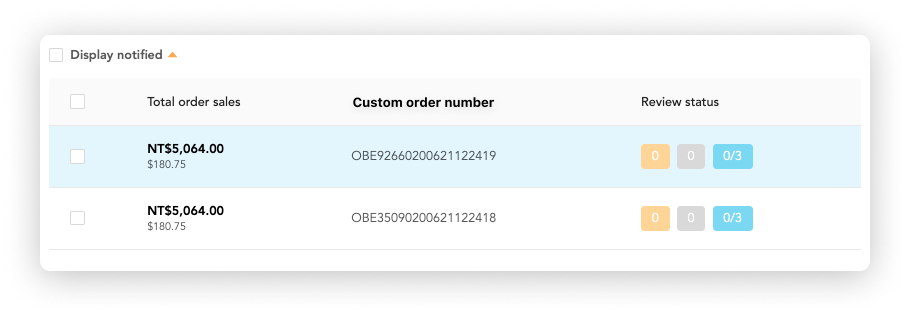
Displays an overview of orders to be reviewed, columns including the order total sales, order serial number and review status.
In the Review Status column, there are three different colors of boxes.
- Orange: shows the number of items that need to be revised
- Grey: shows the number of items awaiting acceptance
- Blue: shows the number of people who have confirmed the order
When you are notified that items needed to be revised or reviewed, a small orange triangle will appear on the left of the order.
B. Review Status
Displays the current review status of the order, including "Individual who initiates revised request" and "Action you need to take". The description is as follows.
- An individual who initiates a revised request: When an individual initiates a "revised request" to another person, the corresponding icon will show the number of comments initiated for correction. For example, in the following figure, the number of items that need to be corrected is 1 for the support specialist.
![]()
- Action you need to take: this shows the action you need to take for this order.

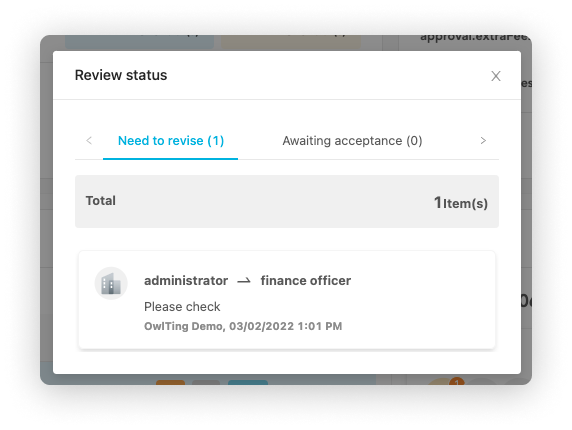
Click "View" to see a detailed description of the action you need to take.
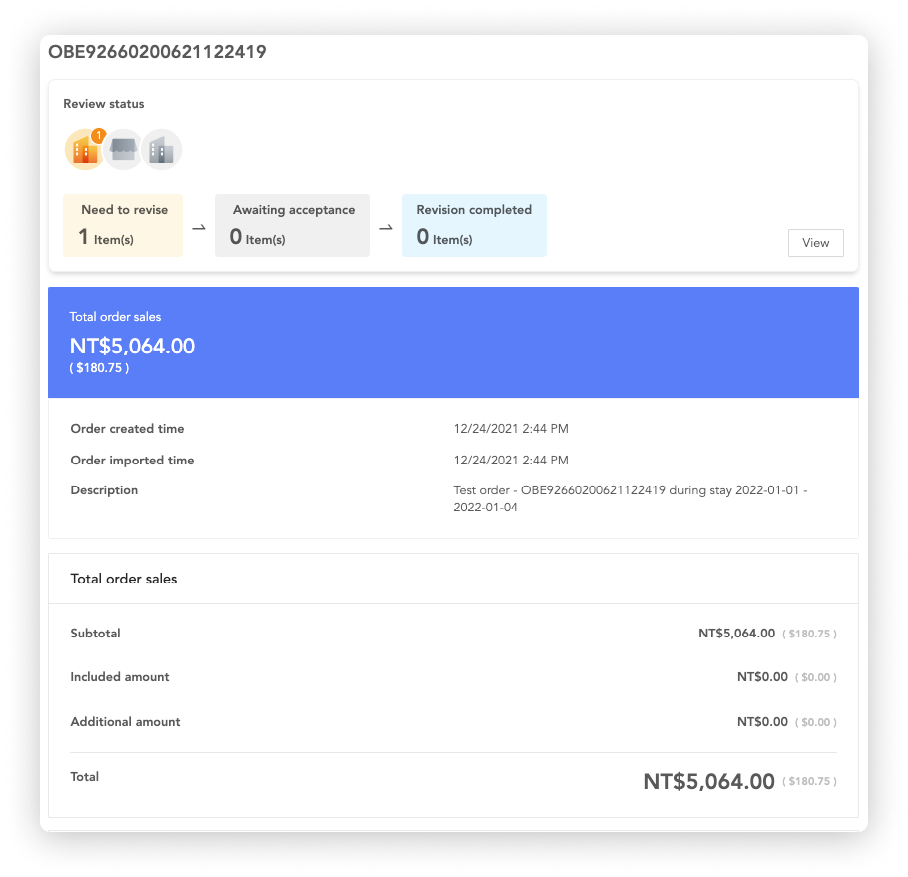
C. Order details
Displays the details of the order, including the total order sales, transaction details...etc.
How to review the reconciliation order
There are 2 ways to complete the review process: (1) One-click approval (2) Step-by-step review.
One-click approval
If you want to approve requests at one time, follow 3 steps below:
1. Toggle the checkbox on the **left of the reconciliation order on the “Review” page

2. Click "Approve and complete", and you will see a pop-up window to let you confirm

3. Click "Approve"
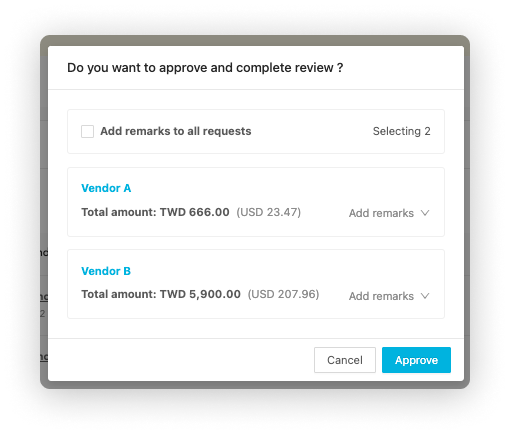
You can add a note to remind subsequent reviewers. If you want to add notes to more than one order, toggle the "Add note to all requests" checkbox. Enter text to add the same comments to multiple orders at once.
This method can only "approve" all of the reconciliation orders. If you want to "reject" the request, please refer to the “Step-by-step review” below.
Step-by-step review
Click the number in the "Reconciliation number" column to go to the specific reconciliation order page and start the review process.

There are 4 steps in the review process.
- Clicks on the order reconciliation to be reviewed
- Discuss review details (refer to multiple role review flow)
- "Approves/reject" the selected reconciliation order
- Clicks "Complete review"
- To implement steps 3 and 4, you should have "approve/reject" permission
- For more details on role permission, refer to Role permissions on OwlPay
- If you want to change the roles' permission, please reach your OwlPay contact.
The “Review” page will be slightly different depending on your Role permissions on OwlPay. There are 2 types :
a.If your role "does not have" the permission to approve the reconciliation order
When you click any order, you can only see "Confirm" and "Need to revise" appear below the "Review Order" heading.
b.If your role "has" the permission to approve the reconciliation order
When you click any order, not only above buttons will appear but "Mark approved" and "Mark rejected" will also appear at the bottom of this page.
- If you click "Mark approved": The order will be approved even if the "Need to revise" warning exists.
- If you click "Mark rejected": the order will be rejected even if the "Need to revise" warning exists.
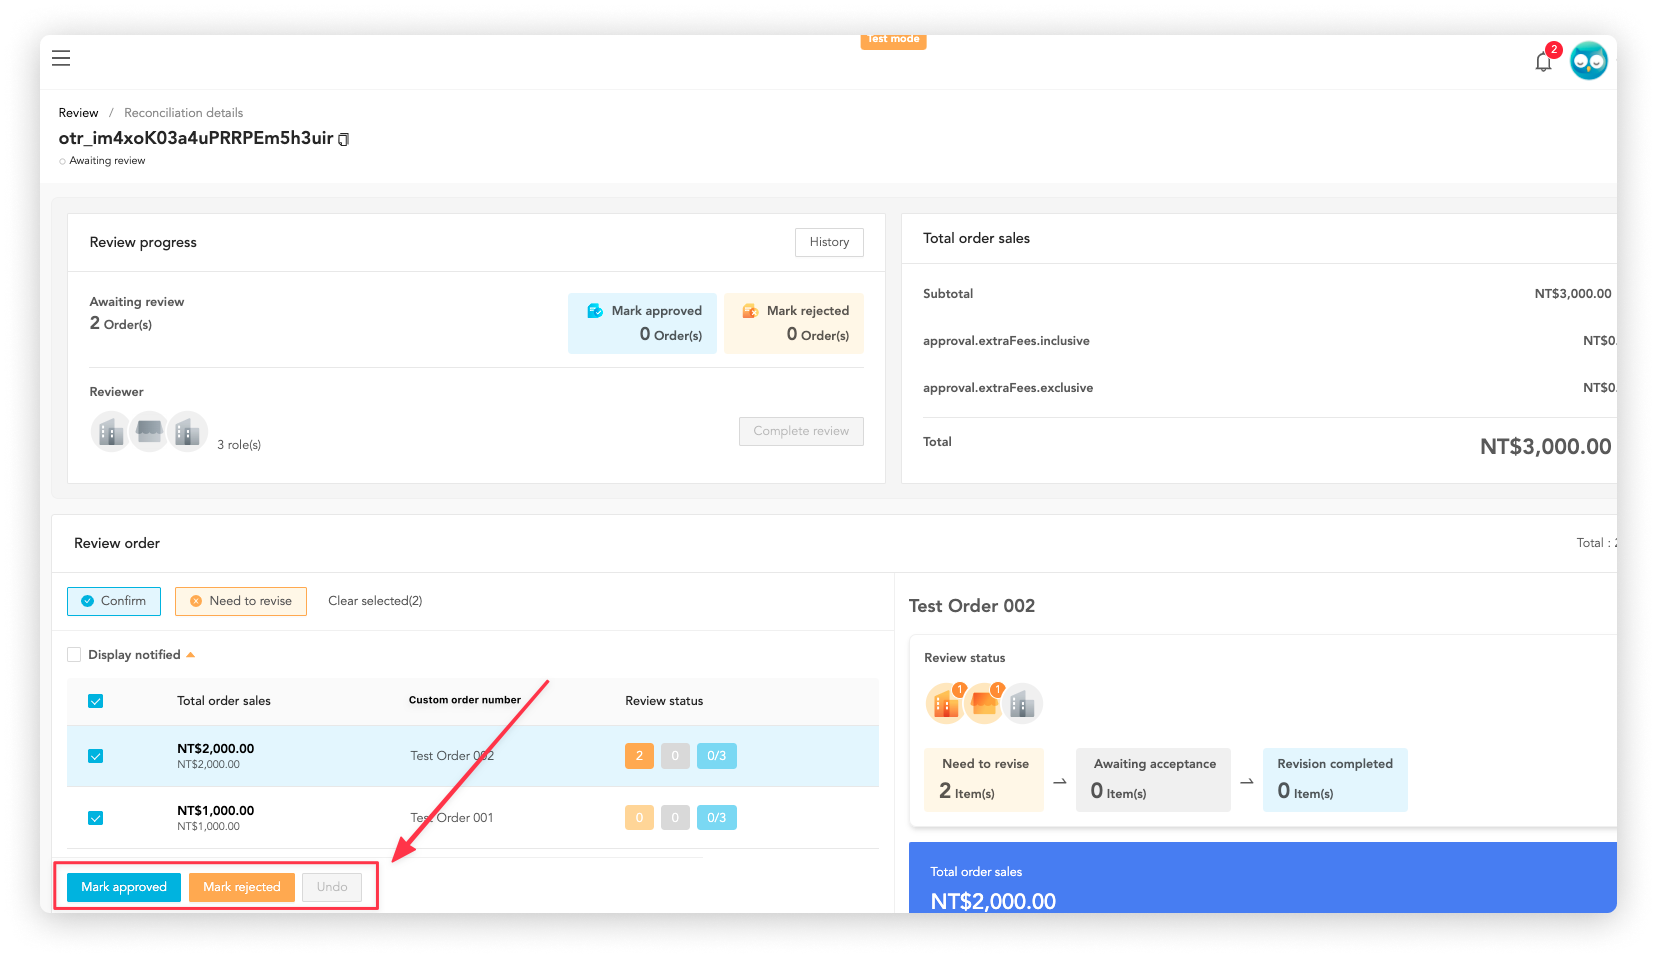
When all of the orders in the request have been reviewed (all have "Mark approved" or "Mark rejected" status), you can click "Complete review".
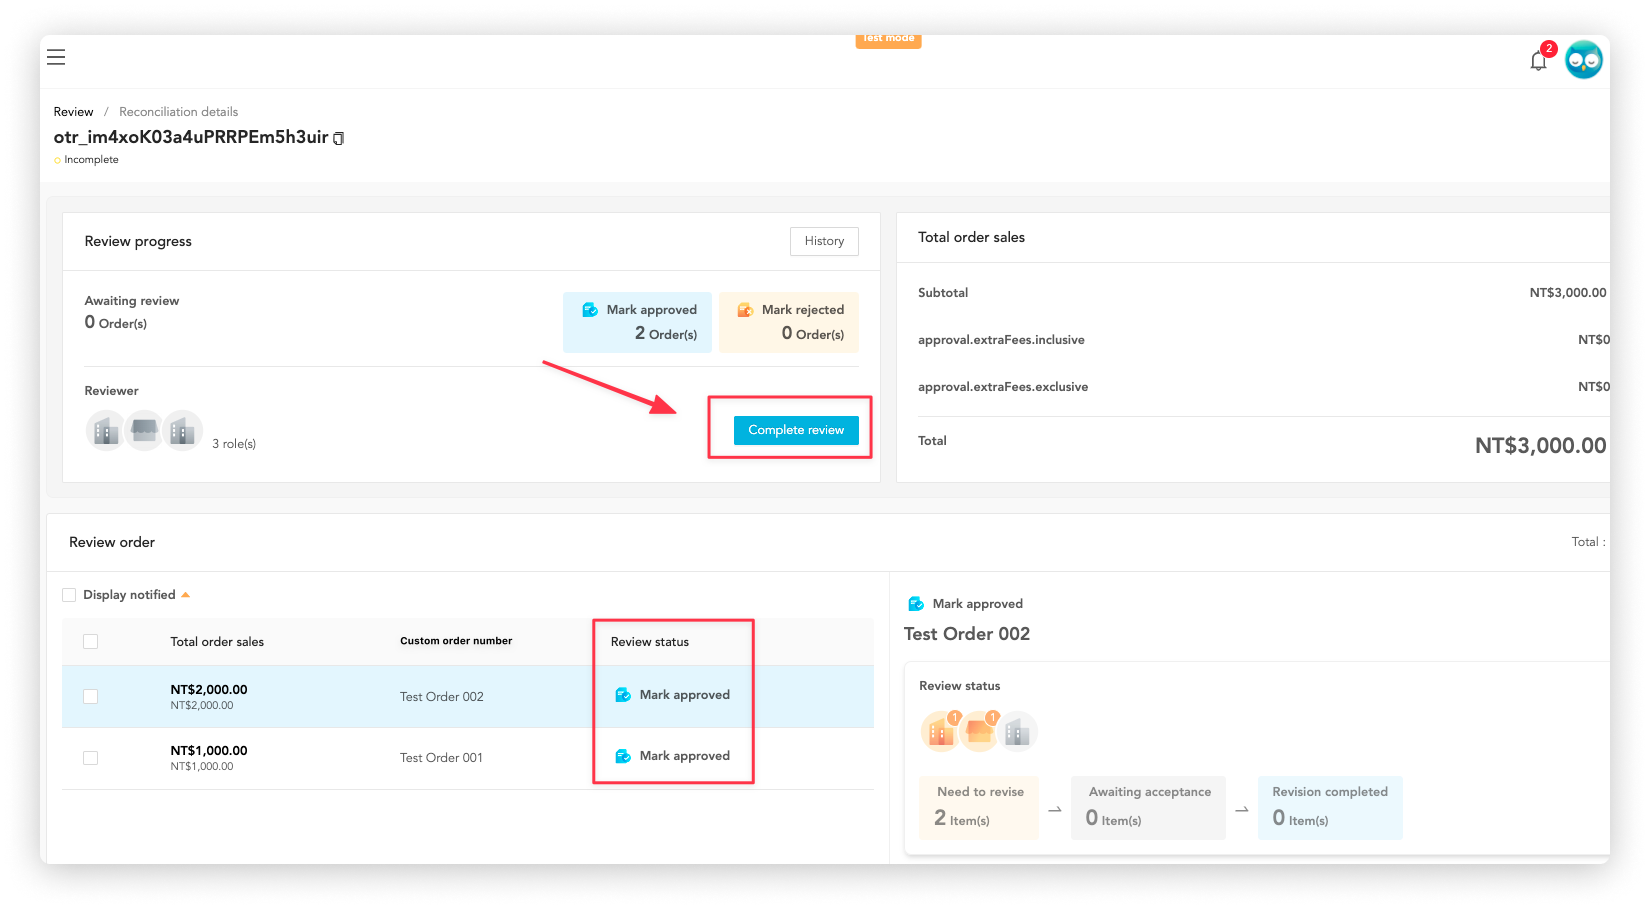
After Clicking "Complete review", the order will be moved to different pages according to the review status.
- If "approved", it will be moved to the Payout
- If "rejected", it will be moved to Reconciliation.
You can see the review status of the reconciliation order on the Order page.
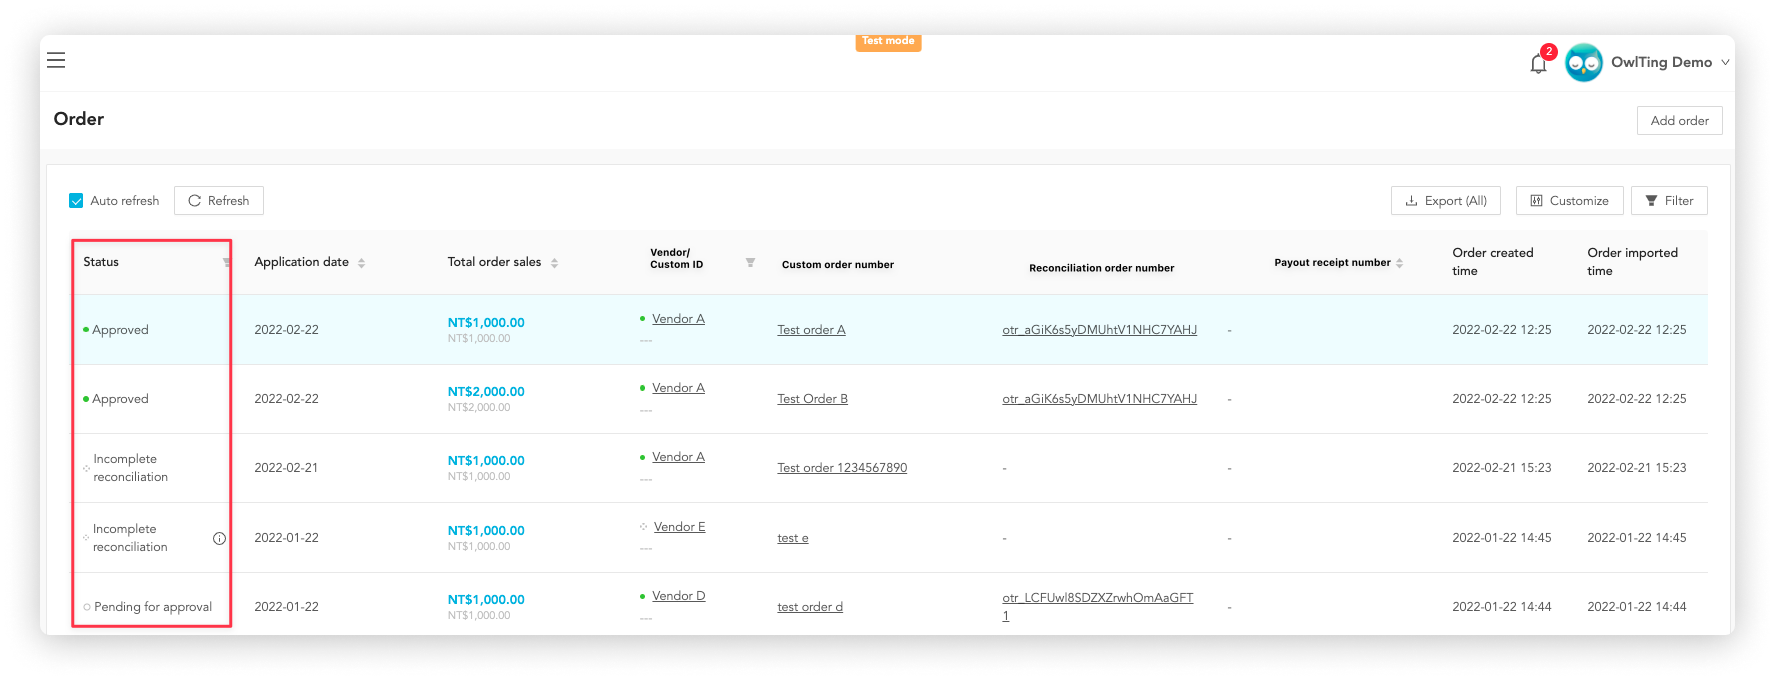
Let's see an example
Step 1. Start reviewing
Assuming you are the "support specialist" of your company, when you click any order on the order list, "Confirm" and "Need to revise" will appear below the title of the Review order.
1-1. If you click "Confirm"
you are confirming that the order is correct and you agree on the application of order reconciliation.
The screen will show how many roles have agreed to the order. For example, the diagram below means that one role (support specialist) has agreed to the order.

If all roles with review permission click "Confirm", go to Step 3.
1-2. If you click "Need to revise"
It means that you have concerns about this order and want specific roles to check the order details again.
You can specify the role to confirm the order and give the reason in the comment field.
Go to Step 2.
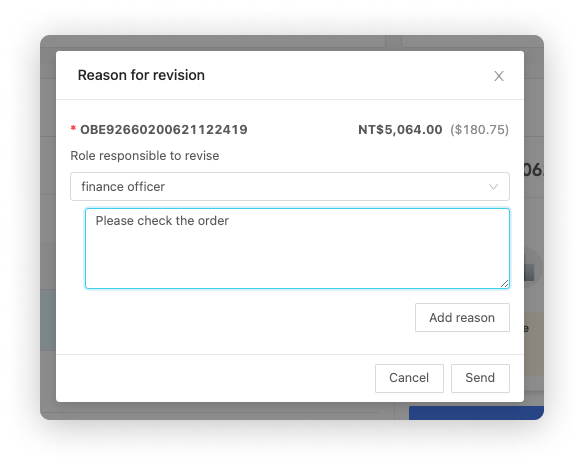
Step 2. Multiple role review process
2-1. Initiate revision
You can specify multiple roles to check and validate the order, just click "Add reason" to specify another role.
The example below shows that you (support specialist) have given revision requests to "Vendor" and "Finance officer".
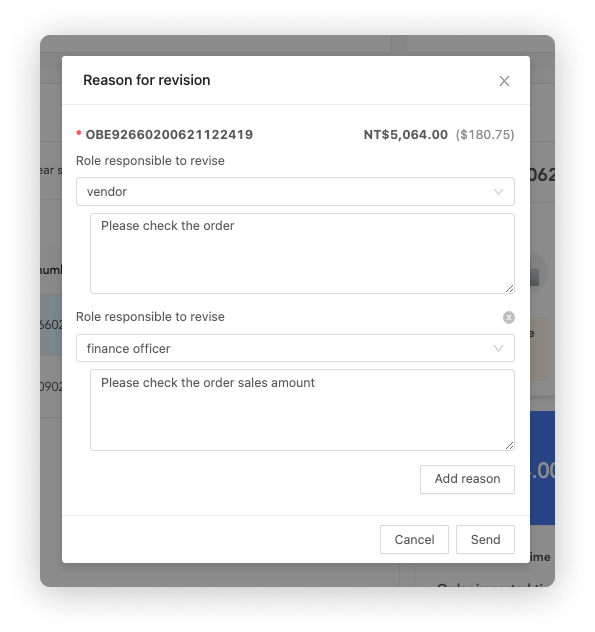
Suppose you have sent three items to be revised, there will be three changes on this page.
1. "Need to revise" shows the number of items to be revised is 3
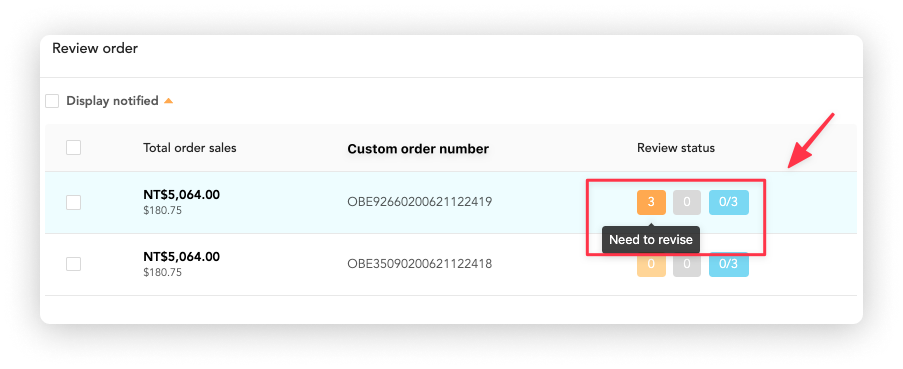
2. "Review status" shows the number of comments that need to be revised by the corresponding role
For example, the icon below means the number of "Need to revise" by the support specialist (you) is 3".
![]()
Number on the icon indicates the number of "Need to revise" raised by the role; if another role (e.g. vendor) raises a "Need to revise" indication, the vendor icon will show one item of "Need to revise".
3. "Review Status" shows the number of "Need to revise", "Awaiting acceptance", and "Revision completed".
The number of "Need to revise" is displayed in the "Need to revise" box.
![]()
Regardless of your role on OwlPay, the changes you see in this order will be the same. For the example above, all roles will see the number of "Need to revise" is 3.
2-2. Notify acceptance after revision
The individual who receives a "Needs to revise" notification can review and edit the order details (if necessary) according to the revision opinions.
After finishing editing, the individual can go back to the Review page to notify the review is done.
Click "View" in the Review Status section > "Notify acceptance".
Quick example
Below is a revision request received by the "Finance officer" from the "Support specialist".
After the "Finance officer" has finished the revision, he/she clicks "Notify acceptance" to notify the "support specialist" to review the revision.
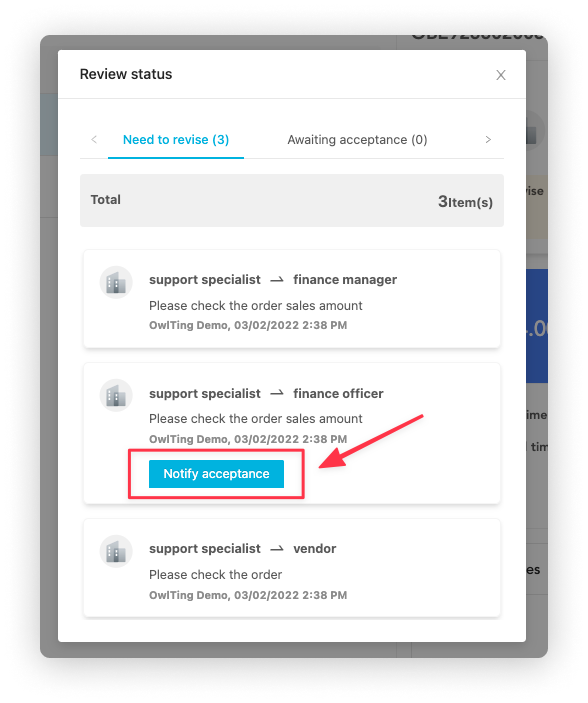
There will be three changes on the screen.
1. The number of "Awaiting acceptance" is changed from 0 to 1

2. The number of "Need to revise", "Awaiting acceptance", and "Revision completed" shown in "Review Status" will be updated
The original number of "Need to revise" is 3, "Awaiting acceptance" is 0 and "Revision completed" is 0.
![]()
3. The updated number of "Need to revise" is 1, "Awaiting acceptance" is 2, and "Revision completed" is 0.
![]()
2-3. Accept revision
To check the revision, follow the steps below:
- Click "View" in the Review Status section
- Click "Confirm" to accept the revision.
![]()
In this case, the number of "Awaiting acceptance" will change from 2 to 1, and "Revision completed" will change from 0 to 1.
![]()
Step 3. Mark approved
Once all "Need to revise" items have been confirmed, the finance officer/manager can click "Mark approved" to approve the order.
If finance officer/manager still has questions about the reconciliation orders, click "Mark Rejected" and go back to Step 1.
How to change role permission to review reconciliation orders
Depending on your company's reconciliation process, the roles involved in reviewing on OwlPay will be different. OwlPay allows you to customize different role permissions.
Below are two examples to illustrate.
Case 1 - The company needs to perform reconciliation with vendors
This is the default review scenario on OwlPay.
The roles involved are:
- All roles of the "Company"
- Owner of "vendor"
On review page, the reviewers are shown as 2 roles (company, vendor).
![]()
Case 2 - The Company is not required to reconcile with vendors
The roles involved are: All roles of the "Company".
On review page, the reviewers are shown as 1 role (company).
![]()
If you want to change role permissions, please contact OwlTing": owlpaysupport@owlting.com
For more details on role permission, refer to Role permissions on OwlPay